
One of NetBox’s killer features is its context data & configuration template rendering, which positions it as the ultimate single source of truth, regardless of the vendor or vendor mix in use.
Configuration context data is an incredibly powerful tool that allows users to define arbitrary data for devices and virtual machines based on specific characteristics. For example, you might need to specify syslog or TACACS servers for devices located at sites within a particular region. Contexts can be applied to hosts and used in configuration templates, in Ansible through NetBox inventory integration, or via API.
By utilizing configuration templates and context data, NetBox can generate comprehensive configuration files for each device on your network, ensuring seamless and consistent configuration management from a single source of truth.
Context data#
In NetBox, context data is assigned to devices and virtual machines according to their relationships with other objects. This data is stored in JSON format. A numeric value determines the order of merging context data, with lower-weight contexts merging before higher-weight ones. Local context data overrides all other data regardless of weight.
Each configuration context can be linked to any number of supported object types. If no related objects are selected, the configuration context is deemed “global” and applies universally to all devices and virtual machines.
Example#
I have created two context configurations in Provisioning > Config Contexts. I will demonstrate the difference between merging a list and a dictionary.
Name: Global-NTP Weight: 1000#
If no assignment filter is set this context is for everyone valid.
{
    "ntp_servers_dict": {
        "server1": "ptbtime1.ptb.de",
        "server2": "ptbtime2.ptb.de"
    },
    "ntp_servers_list": [
        "ptbtime1.ptb.de",
        "ptbtime2.ptb.de"
    ]
}
Name: Eberfing-NTP Weight: 2000 Site: Eberfing#
For Eberfing-NTP the assignment filter for site is set to Eberfing, so only devices assigned to this site will recieve this context.
{
    "ntp_servers_dict": {
        "server1": "10.2.1.1"
    },
    "ntp_servers_list": [
        "10.2.1.1"
    ]
}
After rendering the Global-NTP context and the Eberfing-NTP context, you will see that for the dictionary ntp_servers_dict, only the key server1 is overwritten. However, for the list ntp_servers_list, the entire list is replaced.
You can see the rendered context data by selecting a device from the Eberfing site and navigating to Config Context.
{
    "ntp_servers_dict": {
        "server1": "10.2.1.1",
        "server2": "ptbtime2.ptb.de"
    },
    "ntp_servers_list": [
        "10.2.1.1"
    ]
}
If you overwrite the context data at the device level, this will take precedence.
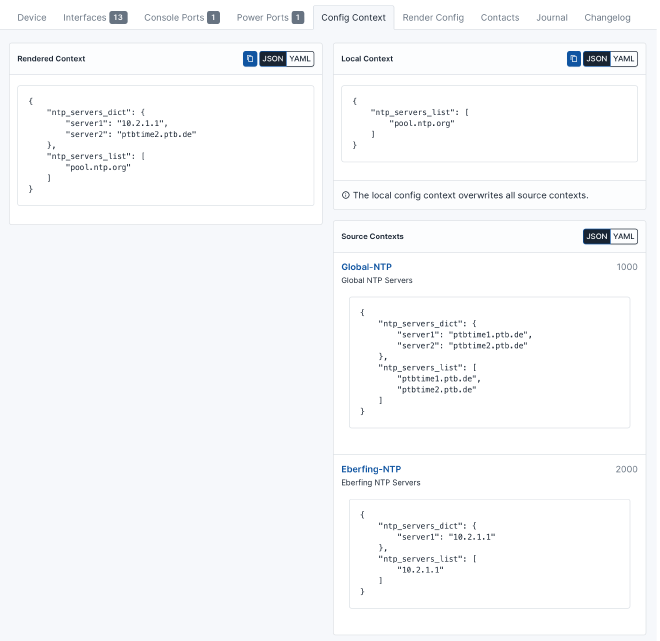
Rendered context:
{
    "ntp_servers_dict": {
        "server1": "10.2.1.1",
        "server2": "ptbtime2.ptb.de"
    },
    "ntp_servers_list": [
        "pool.ntp.org"
    ]
}
Access context via REST API#
You can retrieve the context data for a device via the REST API. Here is an example using the requests library:
requests_netbox.py#
import requests
from pprint import pprint
# Netbox URL
netbox_url = "http://localhost:8000"

# Netbox Token
token = "80cba4ba7d171b679db7c03e026196192bfa7223"

# Device
device_name = "testswitch"

# Headers
headers = {
    "Authorization": f"Token {token}",
    "Content-Type": "application/json"
}

device_url = f"{netbox_url}/api/dcim/devices/?name={device_name}"
response = requests.get(device_url, headers=headers)

if response.status_code == 200:
    devices = response.json().get('results')
    if devices:
        config_context = devices[0].get('config_context')

        # show context
        pprint(config_context)
    else:
        print("Error: Device not found")
else:
    print("Error: Unable to get device infos")
Response:
{'ntp_servers_dict': {'server1': '10.2.1.1', 'server2': 'ptbtime2.ptb.de'},
 'ntp_servers_list': ['pool.ntp.org']}
Access context via Ansible#
Note: This example uses the Netbox inventory plugin.
You can read about how to set up the Netbox inventory plugin in another article. Follow this link.
Note: You must enable config_context in your inventory.yml!
inventory.yml#
---
plugin: netbox.netbox.nb_inventory
validate_certs: False
config_context: True
api_endpoint: http://localhost:8000
token: 80cba4ba7d171b679db7c03e026196192bfa7223
group_by:
  - device_roles
device_query_filters:
  - has_primary_ip: true
This example shows how you can handle loops over the context list and dictionary.
ansible_demo_context.yml#
---
- name: Access context data via Netbox inventory plugin
  hosts: testswitch
  connection: local

  tasks:

    - name: Show context
      debug:
        var: config_context

    - name: Loop over the dictionary
      debug: msg="Key={{ item.key }} value={{ item.value }}"
      with_dict: "{{ config_context[0].ntp_servers_dict }}"

    - name: Loop over the list
      debug: msg="Item={{ item }}"
      with_list: "{{ config_context[0].ntp_servers_list }}"
Configuration templates#
Configuration templates use the Jinja2 templating language and can be automatically populated from remote data sources. When rendering a template, both context data and device instance data are applied to produce a complete configuration file. The key advantage is that you can generate the appropriate config file for any vendor, all while utilizing the same source of truth.
We’ll use the examples from above and render both the list and the dictionary using Jinja.
! Dictionary rendering
{%- for key, value in ntp_servers_dict.items() %}
ntp server {{ value }}
{%- endfor %}
!
! List rendering
{%- for server in ntp_servers_list %}
ntp server {{ server }}
{%- endfor %}
!
Result:
! Dictionary rendering
ntp server 10.2.1.1
ntp server ptbtime2.ptb.de
!
! List rendering
ntp server pool.ntp.org
!
The Jinja templating documentation you can find here.
Use regular templates#
Regular templates are stored directly in Netbox and can be found under Provisioning > Config Templates.
After creating the template, you must assign it to the device.
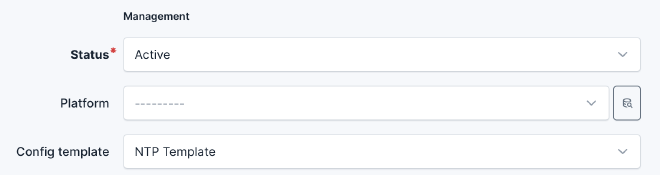
Now you can see your rendered configuration in the Render config tab.

Use the device instance#
The device instance provides direct access to the data stored in Netbox. We can extend our NTP server example by adding hostname, VLANs, and interfaces to the template.
! Hostname
hostname {{ device.name }}
!
! Vlans: (must be assined to site)
{%- for vl in device.site.vlans.all() %}
vlan {{vl.vid }}
  name {{ vl.name }}
{%- endfor %}
!
! NTP:
! Dictionary rendering
{%- for key, value in ntp_servers_dict.items() %}
ntp server {{ value }}
{%- endfor %}
!
! List rendering
{%- for server in ntp_servers_list %}
ntp server {{ server }}
{%- endfor %}
!
! Interfaces:
{%- for interface in device.interfaces.all() %}
interface {{ interface.name }}
! shut / no shut interface
  {%- if interface.enabled == false %}
  shutdown
  {%- elif interface.enabled == true %}
  no shutdown
  {%- endif %}
! Access / Trunk
  {%- if interface.mode == "access" %}
  switchport mode access
  switchport access vlan {{ interface.untagged_vlan.vid }}
  {%- elif interface.mode == "tagged" %}
  switchport mode trunk
  {%- for vl in interface.tagged_vlans.all() %}
  switchport trunk allowed vlan add {{ vl.vid }}
  {%- endfor %}
  {%- elif "tagged-all" in interface.mode %}
  switchport mode trunk
  switchport trunk allowed vlan all
  {%- endif %}
! Description only if not empty
  {%- if interface.description|length %}
  description {{ interface.description }}
  {%- endif %}
!
{%- endfor %}
Result:
! Hostname
hostname testswitch
!
! Vlans: (must be assined to site)
vlan 10
  name VLAN0010
vlan 11
  name VLAN0011
vlan 999
  name Management
!
! NTP:
! Dictionary rendering
ntp server 10.2.1.1
ntp server ptbtime2.ptb.de
!
! List rendering
ntp server pool.ntp.org
!
! Interfaces:
interface GigabitEthernet0/1
! shut / no shut interface
  no shutdown
! Access / Trunk
  switchport mode access
  switchport access vlan 10
! Description only if not empty
!
interface GigabitEthernet0/2
! shut / no shut interface
  no shutdown
! Access / Trunk
  switchport mode access
  switchport access vlan 11
! Description only if not empty
  description Foobar test
!
interface GigabitEthernet0/3
! shut / no shut interface
  no shutdown
! Access / Trunk
  switchport mode trunk
  switchport trunk allowed vlan add 10
  switchport trunk allowed vlan add 11
! Description only if not empty
!
interface GigabitEthernet0/4
! shut / no shut interface
  no shutdown
! Access / Trunk
! Description only if not empty
!
interface GigabitEthernet0/5
! shut / no shut interface
  no shutdown
! Access / Trunk
! Description only if not empty
!
interface GigabitEthernet0/6
! shut / no shut interface
  no shutdown
! Access / Trunk
! Description only if not empty
!
interface GigabitEthernet0/7
! shut / no shut interface
  no shutdown
! Access / Trunk
! Description only if not empty
!
interface GigabitEthernet0/8
! shut / no shut interface
  no shutdown
! Access / Trunk
! Description only if not empty
!
interface GigabitEthernet0/9
! shut / no shut interface
  no shutdown
! Access / Trunk
! Description only if not empty
!
interface GigabitEthernet0/10
! shut / no shut interface
  no shutdown
! Access / Trunk
! Description only if not empty
!
interface Vlan1
! shut / no shut interface
  no shutdown
! Access / Trunk
! Description only if not empty
  description Management
!
Use remote templates#
To create a data source, navigate to Operations > Data Sources.
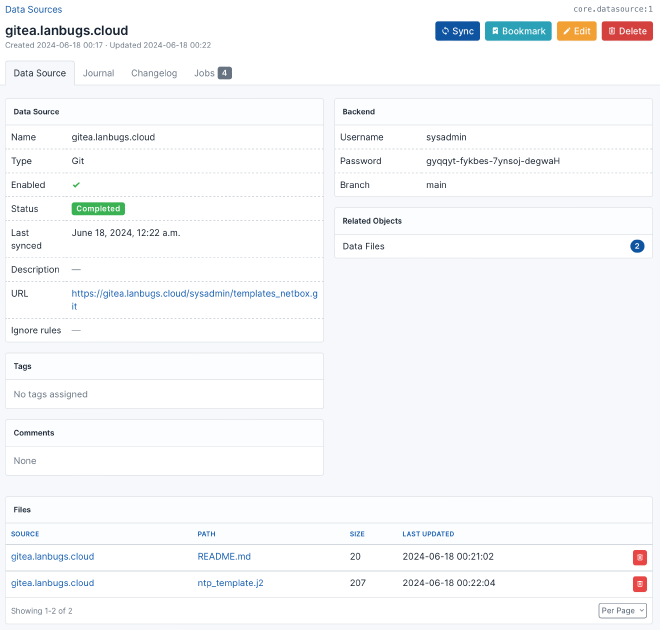
After performing a manual sync, the files from your git repository should appear in the list.
Next, you can create a new configuration template by going to Provisioning > Config Templates.
In the Data Source section, select your git repository and the desired file. Enable auto sync.
Load rendered device template via REST API#
import requests
from pprint import pprint
# Netbox URL
netbox_url = "http://localhost:8000"

# Netbox Token
token = "80cba4ba7d171b679db7c03e026196192bfa7223"

# Device
device_name = "testswitch"

# Headers
headers = {
    "Authorization": f"Token {token}",
    "Content-Type": "application/json"
}

device_url = f"{netbox_url}/api/dcim/devices/?name={device_name}"
response = requests.get(device_url, headers=headers)

if response.status_code == 200:
    devices = response.json().get('results')
    if devices:
        device_id = devices[0].get('id')
        render_response = requests.post(f"{netbox_url}/api/dcim/devices/{device_id}/render-config/", headers=headers)

        if render_response.status_code == 200:

            rendered_config = render_response.json()

            print(rendered_config['content'])

        else:
            print("Error: Could not load rendered config")
    else:
        print("Error: Device not found")
else:
    print("Error: Unable to get device infos")
Load template with own variables via REST API#
You can use the template engine also with own variables.
import requests
from pprint import pprint
import json

# Netbox URL
netbox_url = "http://localhost:8000"

# Netbox Token
token = "80cba4ba7d171b679db7c03e026196192bfa7223"

# Template ID
template_id = 3

# Headers
headers = {
    "Authorization": f"Token {token}",
    "Content-Type": "application/json"
}

# Own variables
data = {
    "ntp_servers_dict": {"server1": "foo.bar", "server2": "foo2.bar"},
    "ntp_servers_list": ["xxx.bar"]
}

render_response = requests.post(f"{netbox_url}/api/extras/config-templates/{template_id}/render/", data=json.dumps(data), headers=headers)

if render_response.status_code == 200:
    rendered_config = render_response.json()

    print(rendered_config['content'])

else:
    print("Error: Could not load rendered config")
Response:
! Dictionary rendering
ntp server foo.bar
ntp server foo2.bar
!
! List rendering
ntp server xxx.bar
!
Conclusion#
In conclusion, NetBox’s context data and configuration templates are powerful tools for network management. They allow for precise and dynamic configurations, automating the creation of detailed config files, ensuring consistency and accuracy. With easy integration and improved efficiency, NetBox is the best choice for managing modern network infrastructures.
Happy automating! 😊