
Forgejo is an interesting alternative to GitLab, Gitea, Bitbucket, etc., especially when hosting your build pipeline on-premises in your data center. In this article, I will show you how to use Forgejo with runners to build a CI/CD pipeline, incorporating development branches, test systems, merges, and releases to production systems. This boilerplate setup can be adapted for various scenarios in NetDevOps, providing a flexible and robust solution for managing your development and deployment processes.
At a glance#
The process begins with a developer who commits code changes to the repository hosted on Forgejo. The GIT repository in Forgejo acts as the central code repository where these changes are pushed. When changes are committed, Forgejo actions are triggered upon various events such as commits, merges, and tag creations. These actions initiate the runner, which is responsible for executing the build and test processes defined in the actions. The runner ensures that the code is compiled, tested, and packaged if necessary.
Once the code passes all tests, it is tagged as a release and is ready to be deployed to the production system. The test system receives the builds for thorough testing, ensuring that all features and fixes work as expected. After thorough testing, a release tag is created. The tagged release is then deployed to both the test system and the production system, ensuring consistency and reliability in the deployment process.
In my lab repository, the main branch serves as the stable branch. All changes are made in the development branch. These changes are subjected to testing, built, and deployed to the test system via actions workflow whenever a new commit is made. New features are developed as sub-branches from development and then merged back into development. Once the development environment is ready for release, the development branch is merged into main. When a tag is set in the main branch, the actions workflow ensures that the tagged release is rolled out to the production system.
This strategy ensures a streamlined development process, maintaining stability in the main branch while facilitating continuous integration and deployment through the development branch. By following this approach, we can effectively manage and deploy new features and updates with minimal disruption.
Forgejo … what is that???#

Forgejo is a fork of Gitea, an open-source alternative to GitHub and GitLab for self-hosting. It offers easy deployment with a single binary available for nearly every platform. Forgejo was created in October 2022 after a for-profit company acquired Gitea. It operates under Codeberg e.V., a non-profit organization, and is developed in the public interest. This governance difference has led to significant and lasting changes, making Forgejo distinct from Gitea.
Initially described as a “soft fork” of Gitea, similar to LineageOS from Android, Forgejo is better seen as a product built on Gitea, Git, and many other Free Software projects. The project emphasizes community-driven development, transparency, and open governance, ensuring it remains free from commercial influence and continues to meet the needs of developers worldwide.
Demo environment#
| System | Description |
|---|---|
| forgejo | GIT system |
| runner | ACT runner |
| testsystem | Test system |
| prodsystem | Productive system |
All machines are running Ubuntu and Docker, except for the GIT system.
Setup Forgejo#
Get binary#
Download the binary from codeberg.org, make it executable and move it to /usr/local/bin.
wget https://codeberg.org/forgejo/forgejo/releases/download/v7.0.4/forgejo-7.0.4-linux-amd64
chmod +x forgejo-7.0.4-linux-amd64
mv forgejo-7.0.4-linux-amd64 /usr/local/bin/forgejo
Create user#
Create a user named git on the system.
 adduser --system --shell /bin/bash --gecos 'Git Version Control' \
  --group --disabled-password --home /home/git  git
Create folders#
Create the necessary directories and set the appropriate permissions.
mkdir /var/lib/forgejo
chown git:git /var/lib/forgejo && chmod 750 /var/lib/forgejo
mkdir /etc/forgejo
chown root:git /etc/forgejo && chmod 770 /etc/forgejo
Database setup#
Depending on your deployment size, you may need to set up PostgreSQL or MariaDB. For a small setup, you can use the built-in SQLite. If you choose SQLite, simply select it in the web installer and no additional preparation is required.
See database preparation @ Forgejo
Systemd#
wget -O /etc/systemd/system/forgejo.service https://codeberg.org/forgejo/forgejo/raw/branch/forgejo/contrib/systemd/forgejo.service
If you’re using MySQL, MariaDB, or PostgreSQL instead of SQLite, you’ll need to open the file (/etc/systemd/system/forgejo.service) and remove the comment markers from the relevant Wants= and After= lines. Otherwise, the default configuration should work fine.
systemctl daemon-reload
systemctl enable --now forgejo.service
Finish inital setup#
Go to http://<ip>:3000 and complete the setup using the web assistant.
Reverse proxy nginx#
You can install Nginx to serve as a reverse proxy for Forgejo.
apt install nginx
Create new config in /etc/nginx/conf.d/forgejo.conf.
server {
    listen 80;
    listen [::]:80;
    server_name forgejo.m.local; # Change this to the server domain name.

    location / {
        proxy_pass http://127.0.0.1:3000; # Port 3000 is the default Forgejo port

        proxy_set_header Connection $http_connection;
        proxy_set_header Upgrade $http_upgrade;
        proxy_set_header Host $host;
        proxy_set_header X-Real-IP $remote_addr;
        proxy_set_header X-Forwarded-For $proxy_add_x_forwarded_for;
        proxy_set_header X-Forwarded-Proto $scheme;

        client_max_body_size 512M;
    }
}
Next, restart Nginx.
systemctl restart nginx
You must modify /etc/forgejo/app.ini and edit the following settings:
...
# if you are using http
ROOT_URL = http://forgejo.m.lab

# if you are using https
ROOT_URL = https://forgejo.m.lab
...

## Append at the end

[actions]
ENABLED = true
Then, restart the Forgejo service:
systemctl restart forgejo
Setup Forgejo Runner#
On the runner host, Docker is installed along with the Forgejo runner.
Install docker environment#
I have released a single-file installer for Docker, which installs both Docker and Docker Compose together.
/bin/bash -c "$(curl -fsSL https://raw.githubusercontent.com/lanbugs/docker_installer/HEAD/installer_docker.sh)"
Install forgejo-runner#
Create a dedicated user for the runner.
adduser --system --shell /bin/bash --gecos 'Forgejo Runner' \
  --group --disabled-password --home /var/lib/forgejo_runner  runner
Allow the runner user access to Docker.
usermod -aG docker runner
Download the Forgejo runner and make it executable.
wget https://code.forgejo.org/forgejo/runner/releases/download/v3.5.0/forgejo-runner-3.5.0-linux-amd64
chmod +x forgejo-runner-3.5.0-linux-amd64
mv forgejo-runner-3.5.0-linux-amd64 /usr/local/bin/forgejo-runner
Switch to the new user and initialize the general configuration. To register the new runner, you need to obtain a token from your Forgejo instance.
Go to Site Administration > Actions > Runners if you want to use the runner globally,
or go to Settings > Actions > Runners if you want the runner to be available only for a
specific project. Click on Create new runner.
su forgejo_runner -
cd /var/lib/forgejo_runner

# generate general config
forgejo-runner generate-config > config.yaml

# register new runner
forgejo-runner register

INFO Registering runner, arch=amd64, os=linux, version=v3.5.0.
WARN Runner in user-mode.
INFO Enter the Forgejo instance URL (for example, https://next.forgejo.org/):
https://forgejo.lanbugs.cloud

INFO Enter the runner token:
xxxxxxxxxxxxxxxxxxxxxxxxxxxxxxxxxxxxxxxx

INFO Enter the runner name (if set empty, use hostname: runner):
runner.lanbugs.cloud

INFO Enter the runner labels, leave blank to use the default labels (comma-separated, for example, ubuntu-20.04:docker://node:20-bookworm,ubuntu-18.04:docker://node:20-bookworm):
ubuntu-latest:docker://ghcr.io/catthehacker/ubuntu:act-latest

INFO Registering runner, name=runner.lanbugs.cloud, instance=https://forgejo.lanbugs.cloud, labels=[ubuntu-latest:docker://ghcr.io/catthehacker/ubuntu:act-latest].
DEBU Successfully pinged the Forgejo instance server
INFO Runner registered successfully.
Create a new systemd start file at /etc/systemd/system/forgejo_runner.service.
[Unit]
Description=Forgejo Actions runner
Documentation=https://code.forgejo.org/forgejo/runner
After=docker.service

[Service]
ExecStart=/usr/local/bin/forgejo-runner daemon --config /var/lib/forgejo_runner/config.yaml
ExecReload=/bin/kill -s HUP $MAINPID
WorkingDirectory=/var/lib/forgejo_runner
TimeoutSec=0
RestartSec=10
Restart=always
User=runner
Group=runner

[Install]
WantedBy=multi-user.target
Now we restart the systemd daemon and start the forgejo-runner.service.
systemctl daemon-reload
systemctl enable --now forgejo_runner.service

# check status
systemctl status forgejo_runner.service


● forgejo_runner.service - Forgejo Actions runner
     Loaded: loaded (/etc/systemd/system/forgejo_runner.service; enabled; preset: enabled)
     Active: active (running) since Sun 2024-06-23 06:16:36 UTC; 2s ago
   Main PID: 157704 (forgejo-runner)
      Tasks: 10 (limit: 9252)
     Memory: 6.8M (peak: 7.7M)
        CPU: 85ms
     CGroup: /system.slice/forgejo_runner.service
             └─157704 /usr/local/bin/forgejo-runner daemon --config /var/lib/forgejo_runner/config.yaml

Jun 23 06:16:36 runner systemd[1]: Started forgejo_runner.service - Forgejo Actions runner.
Jun 23 06:16:36 runner forgejo-runner[157704]: time="2024-06-23T06:16:36Z" level=info msg="Starting runner daemon"
Jun 23 06:16:36 runner forgejo-runner[157704]: time="2024-06-23T06:16:36Z" level=info msg="runner: runner.lanbugs.cloud, with version: v3.5.0, with labels: [ubuntu-latest], declared succ>
Jun 23 06:16:36 runner forgejo-runner[157704]: time="2024-06-23T06:16:36Z" level=info msg="[poller 0] launched"
You should see now the new runner in mode idle in the list.

Setup demo repository#
Click on New repository, enter the repository name middleware_app,
and check the box for Initialize repository (Adds .gitignore, License and README).
In this demo, the new repository is called m.lab/middleware_app.
Demo code#
I use a minimal Flask application to showcase the CI/CD functionalities in Forgejo.
app/app.py#
The code imports the Flask class from the flask module and creates an instance of it
called app. It defines a route for the root URL ("/") and associates it with the index
function. When this route is accessed, the index function returns a JSON response with the
key-value pair {“Hello”: “World”}.
from flask import Flask

app = Flask(__name__)

@app.route("/")
def index():
    return {"Hello": "World"}
test_app.py#
The code imports the pytest module and the Flask application instance app from
the app.app module. It defines a pytest fixture named client that configures
the Flask application for testing and creates a test client. The test_index function
uses this test client to send a GET request to the root URL ("/").
It then asserts that the response status code is 200 and that the response
JSON data matches {“Hello”: “World”}.
import pytest
from app.app import app

@pytest.fixture
def client():
    app.config['TESTING'] = True
    with app.test_client() as client:
        yield client

def test_index(client):
    rv = client.get('/')
    assert rv.status_code == 200
    assert rv.get_json() == {"Hello": "World"}
Dockerfile#
The Dockerfile begins by specifying the base image python:3.12.
It sets Maximilian Thoma as the maintainer. The working directory inside the container
is set to /app. The requirements.txt file is copied into the container and its contents
are installed using pip3. The start.py file and the app directory are then copied into
the container. Port 5000 is exposed for the application. Finally, the container is
configured to run gunicorn to serve the Flask application, binding it to all network
interfaces on port 5000.
FROM python:3.12

MAINTAINER Maximilian Thoma

WORKDIR /app

COPY requirements.txt requirements.txt
RUN pip3 install -r requirements.txt

COPY ./start.py .
COPY ./app ./app

EXPOSE 5000

CMD ["gunicorn", "--bind", "0.0.0.0:5000", "start:app"]
start.py#
The import statement from app.app import app is used to import the Flask
application instance from the app/app.py file. This is necessary for Gunicorn
to know which application to run.
from app.app import app
requirements.txt#
These dependencies are installed when the pip3 install -r requirements.txt command
is run during the Docker image build process.
flask
gunicorn
pytest.ini#
The pytest.ini file is configured to have pytest automatically look for test files
in the tests directory and add the current directory (.) to the Python path.
This ensures that all necessary modules can be imported correctly and the tests run smoothly.
[pytest]
testpaths = tests
pythonpath = .
My demo repository looks like this now:

Pipeline: .forgejo/workflows/main.yml#
To begin, I created a workflow for the main branch to automatically test the code with pytest to ensure it is clean.
The workflow is triggered on any push to the main branch and defines
a single job named test that runs on the ubuntu-latest runner.
The steps in the job are as follows:
- Check out repository: Uses the
actions/checkout@v2action to check out the repository’s code. - Set up Python: Uses the
actions/setup-python@v2action to set up Python 3.12. - Install dependencies:
- Upgrades
pip. - Installs
flake8andpytestusingpip. - Installs the dependencies listed in
requirements.txt.
- Upgrades
- Run tests: Executes the test suite using
pytest.
The workflow ensures that the code is checked out,
the Python environment is set up, the necessary dependencies are installed,
and the tests are run whenever there is a push to the main branch.
name: Pipeline main branch

on:
  push:
    branches:
      - main

jobs:
  test:
    runs-on: ubuntu-latest

    steps:
    - name: Check out repository
      uses: actions/checkout@v2

    - name: Set up Python
      uses: actions/setup-python@v2
      with:
        python-version: 3.12

    - name: Install dependencies
      run: |
        python -m pip install --upgrade pip
        pip install flake8 pytest
        pip install -r requirements.txt

    - name: Run tests
      run: |
        pytest
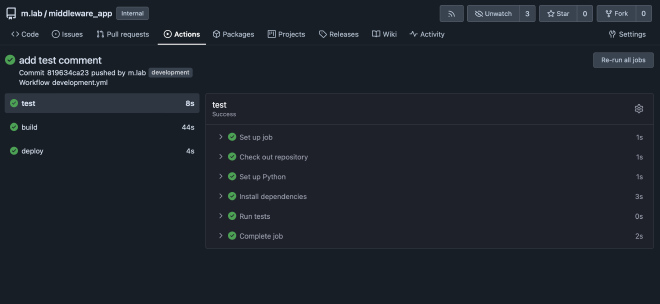
When you commit the new pipeline to the repository, it will be automatically executed.
You can view the action runs in the Actions tab.

You can unfold Run tests to see the results.

Pipeline: .forgejo/workflows/development.yml#
Now I have built a pipeline that tests the code, builds a Docker image called development-release
and deploys this package to the test system. This pipeline is triggered only when commits
are made to the development branch.
Trigger:
- The pipeline runs when there is a push to the
developmentbranch.
Jobs:
Test Job:
- Runs on:
ubuntu-latest - Steps:
- Check out repository: Uses the
actions/checkout@v2action to check out the code from the repository. - Set up Python: Uses the
actions/setup-python@v2action to set up Python version 3.12. - Install dependencies:
- Upgrades pip.
- Installs
flake8andpytest. - Installs additional dependencies from
requirements.txt.
- Run tests: Runs tests using
pytest.
- Check out repository: Uses the
- Runs on:
Build Job:
- Runs on:
ubuntu-latest - Steps:
- Check out repository: Uses the
actions/checkout@v2action to check out the code from the repository. - Set up QEMU: Uses the
docker/setup-qemu-action@v3action. - Set up Docker Buildx: Uses the
docker/setup-buildx-action@v3action. - Login to Docker registry: Uses the
docker/login-action@v3action with credentials stored in secrets (PRIVATE_REGISTRY_URL,PRIVATE_REGISTRY_USERNAME, andPRIVATE_REGISTRY_PASSWORD). - Build and push Docker image: Uses the
docker/build-push-action@v6action to build and push the Docker image with the tagforgejo.lanbugs.cloud/m.lab/middleware_app:development-release.
- Check out repository: Uses the
- Runs on:
Deploy Job:
- Runs on:
ubuntu-latest - Steps:
- SSH and deploy to production: Uses the
appleboy/ssh-action@v1.0.3action to SSH into the production server (Host:testsystem.lanbugs.cloud) with credentials stored in secrets (SSH_USERandSSH_PASS).- Logs into the Docker registry.
- Changes directory to
/opt/dev. - Pulls the latest Docker images using
docker-compose pull. - Brings up the services using
docker-compose up -d.
- SSH and deploy to production: Uses the
- Runs on:
As you can see, some variables and secrets are set in the workflow. These variables and secrets are stored in the project settings, not directly in the workflow file.
name: CI/CD Pipeline Development branch

on:
  push:
    branches:
      - development

jobs:
  test:
    runs-on: ubuntu-latest

    steps:
    - name: Check out repository
      uses: actions/checkout@v2

    - name: Set up Python
      uses: actions/setup-python@v2
      with:
        python-version: 3.12

    - name: Install dependencies
      run: |
        python -m pip install --upgrade pip
        pip install flake8 pytest
        pip install -r requirements.txt

    - name: Run tests
      run: |
        pytest

  build:
    runs-on: ubuntu-latest
    steps:

    - name: Check out repository
      uses: actions/checkout@v2

    - name: Set up QEMU
      uses: docker/setup-qemu-action@v3

    - name: Set up Docker Buildx
      uses: docker/setup-buildx-action@v3

    - name: Login docker registry
      uses: docker/login-action@v3
      with:
        registry: ${{ secrets.PRIVATE_REGISTRY_URL }}
        username: ${{ secrets.PRIVATE_REGISTRY_USERNAME }}
        password: ${{ secrets.PRIVATE_REGISTRY_PASSWORD }}


    - name: Build and push
      uses: docker/build-push-action@v6
      with:
        push: true
        tags: forgejo.lanbugs.cloud/m.lab/middleware_app:development-release

  deploy:
    runs-on: ubuntu-latest
    steps:
      - name: SSH and deploy to production
        uses: https://github.com/appleboy/ssh-action@v1.0.3
        with:
          host: testsystem.lanbugs.cloud
          username: ${{ secrets.SSH_USER }}
          password: ${{ secrets.SSH_PASS }}
          script: |
            echo "${{ secrets.PRIVATE_REGISTRY_PASSWORD }}" | docker login ${{ secrets.PRIVATE_REGISTRY_URL }} -u "${{ secrets.PRIVATE_REGISTRY_USERNAME }}" --password-stdin
            cd /opt/dev
            docker-compose pull
            docker-compose up -d
To store variables and credentials, go to Settings > Actions > Secrets in your project
to create the required variables. This ensures that sensitive information is securely
managed and not exposed in the workflow configuration.

Now when you commit to the development branch the workflow will trigger.
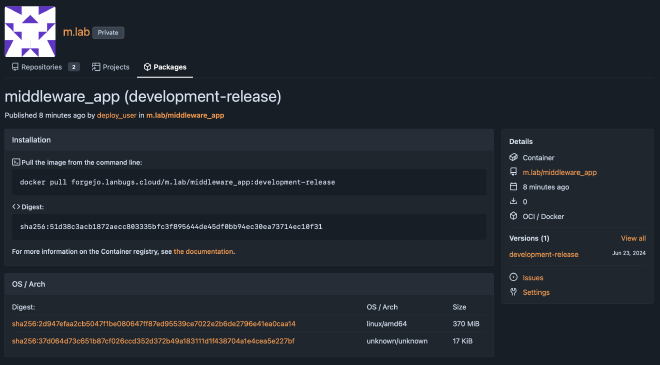
In m.lab > Packages, the development-release Docker container is now available.
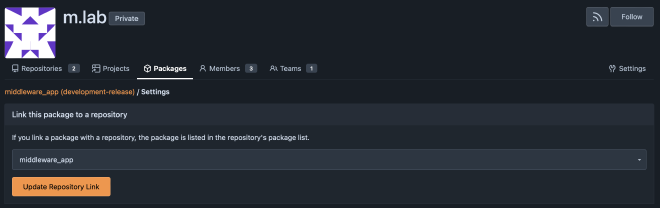
To bind the packages repository to the Git repository,
go to settings and select middleware_app.
On the test system, there is a docker-compose.yaml file executed by the workflow.
It fetches the new Docker image from the package repository and starts it.
version: '3'

services:
  flask-app:
    image: forgejo.lanbugs.cloud/m.lab/middleware_app:development-release
    ports:
      - "80:5000"
    environment:
      - ENV_VAR=development
If you look now on the test system and execute docker ps you see the test container.
# docker ps
CONTAINER ID   IMAGE                                                            COMMAND                  CREATED          STATUS          PORTS                                   NAMES
700da7aecd5d   forgejo.lanbugs.cloud/m.lab/middleware_app:development-release   "gunicorn --bind 0.0…"   18 seconds ago   Up 17 seconds   0.0.0.0:80->5000/tcp, :::80->5000/tcp   dev-flask-app-1
Pipeline: .forgejo/workflows/production.yml#
The production workflow should only be triggered when a new release is tagged on the main branch. In this case, it should also automatically be tested, build, and pushed to the production system.
Trigger:
- This workflow is triggered by a push to any tag that matches the pattern
v*.*.*.
Jobs:
Test Job:
- Runs on:
ubuntu-latest - Steps:
- Check out repository: Uses the
actions/checkout@v2action to check out the code from the repository. - Set up Python: Uses the
actions/setup-python@v2action to set up Python version 3.12. - Install dependencies:
- Upgrades pip.
- Installs
flake8andpytest. - Installs additional dependencies from
requirements.txt.
- Run tests: Runs tests using
pytest.
- Check out repository: Uses the
- Runs on:
Build Job:
- Runs on:
ubuntu-latest - Steps:
- Check out repository: Uses the
actions/checkout@v2action to check out the code from the repository. - Set up QEMU: Uses the
docker/setup-qemu-action@v3action. - Set up Docker Buildx: Uses the
docker/setup-buildx-action@v3action. - Login to Docker registry: Uses the
docker/login-action@v3action with credentials stored in secrets (PRIVATE_REGISTRY_URL,PRIVATE_REGISTRY_USERNAME, andPRIVATE_REGISTRY_PASSWORD). - Build and push Docker image: Uses the action docker/build-push-action@v6 to build and push the Docker image. The image is tagged with latest and the tag name from the Git reference.
- Check out repository: Uses the
- Runs on:
Deploy Job:
- Runs on:
ubuntu-latest - Steps:
- SSH and deploy to production: Uses the
appleboy/ssh-action@v1.0.3action to SSH into the production server (Host:prodsystem.lanbugs.cloud) with credentials stored in secrets (SSH_USERandSSH_PASS).- Logs into the Docker registry.
- Changes directory to
/opt/prod. - Pulls the latest Docker images using
docker-compose pull. - Brings up the services using
docker-compose up -d.
- SSH and deploy to production: Uses the
- Runs on:
name: CI/CD Pipeline Main branch build production

on:
  push:
    tags:
      - 'v*.*.*'

jobs:
  test:
    runs-on: ubuntu-latest

    steps:
    - name: Check out repository
      uses: actions/checkout@v2

    - name: Set up Python
      uses: actions/setup-python@v2
      with:
        python-version: 3.12

    - name: Install dependencies
      run: |
        python -m pip install --upgrade pip
        pip install flake8 pytest
        pip install -r requirements.txt

    - name: Run tests
      run: |
        pytest

  build:
    runs-on: ubuntu-latest
    steps:

    - name: Check out repository
      uses: actions/checkout@v2

    - name: Set up QEMU
      uses: docker/setup-qemu-action@v3

    - name: Set up Docker Buildx
      uses: docker/setup-buildx-action@v3

    - name: Login docker registry
      uses: docker/login-action@v3
      with:
        registry: ${{ secrets.PRIVATE_REGISTRY_URL }}
        username: ${{ secrets.PRIVATE_REGISTRY_USERNAME }}
        password: ${{ secrets.PRIVATE_REGISTRY_PASSWORD }}


    - name: Build and push
      uses: docker/build-push-action@v6
      with:
        push: true
        tags: forgejo.lanbugs.cloud/m.lab/middleware_app:latest,forgejo.lanbugs.cloud/m.lab/middleware_app:${{ github.ref_name }}


  deploy:
    runs-on: ubuntu-latest
    steps:
      - name: SSH and deploy to production
        uses: https://github.com/appleboy/ssh-action@v1.0.3
        with:
          host: prodsystem.lanbugs.cloud
          username: ${{ secrets.SSH_USER }}
          password: ${{ secrets.SSH_PASS }}
          script: |
            echo "${{ secrets.PRIVATE_REGISTRY_PASSWORD }}" | docker login ${{ secrets.PRIVATE_REGISTRY_URL }} -u "${{ secrets.PRIVATE_REGISTRY_USERNAME }}" --password-stdin
            cd /opt/prod
            docker-compose pull
            docker-compose up -d
To test this workflow I create a new release in the main branch.
The tag v1.0.0 triggers the workflow production to run.
Now are also the latest and v1.0.0 package available.

The docker-compose.yaml is pretty the same only the label is set to latest.
If you look now on the prod system and execute docker ps you see the prod container.
# docker ps
CONTAINER ID   IMAGE                                                            COMMAND                  CREATED         STATUS         PORTS                                   NAMES
50dd033b6d1e   forgejo.lanbugs.cloud/m.lab/middleware_app:latest                "gunicorn --bind 0.0…"   3 minutes ago   Up 3 minutes   0.0.0.0:80->5000/tcp, :::80->5000/tcp   prod-flask-app-1
Now that all CI/CD workflows are defined and tested, we can start having fun.
Do changes in the development branch#
Lets start working in the development branch.
Clone the repo#
git clone git@forgejo.lanbugs.cloud:m.lab/middleware_app.git
Klone nach 'middleware_app'...
remote: Enumerating objects: 37, done.
remote: Counting objects: 100% (37/37), done.
remote: Compressing objects: 100% (24/24), done.
remote: Total 37 (delta 9), reused 0 (delta 0), pack-reused 0
Empfange Objekte: 100% (37/37), fertig.
Löse Unterschiede auf: 100% (9/9), fertig.
Switch to development branch#
git checkout development
Zu Branch 'development' gewechselt
Ihr Branch ist auf demselben Stand wie 'origin/development'.
Now that we have made some modifications, we want to extend Flask with a new route. Following a test-driven development approach, we first define our test and then build the function.
Therefore, we extend tests/test_app.py with a new route test.
...
def test_newroute(client):
    rv = client.get('/newroute')
    assert rv.status_code == 200
    assert rv.get_json() == {"message": "foobar"}
To prove that pytest works, we can now commit this to the development branch and
observe the results.
# add modficications
git add -A
# make a commit
git commit -m "added new test for newroute"
[development 6ad7ec0] add test for new route
 1 file changed, 4 insertions(+)
# push
git push

Objekte aufzählen: 7, fertig.
Zähle Objekte: 100% (7/7), fertig.
Delta-Kompression verwendet bis zu 11 Threads.
Komprimiere Objekte: 100% (3/3), fertig.
Schreibe Objekte: 100% (4/4), 388 Bytes | 388.00 KiB/s, fertig.
Gesamt 4 (Delta 2), Wiederverwendet 0 (Delta 0), Paket wiederverwendet 0 (von 0)
remote:
remote: Create a new pull request for 'development':
remote:   https://forgejo.lanbugs.cloud/m.lab/middleware_app/compare/main...development
remote:
To forgejo.lanbugs.cloud:m.lab/middleware_app.git
   49d55bc..6ad7ec0  development -> development
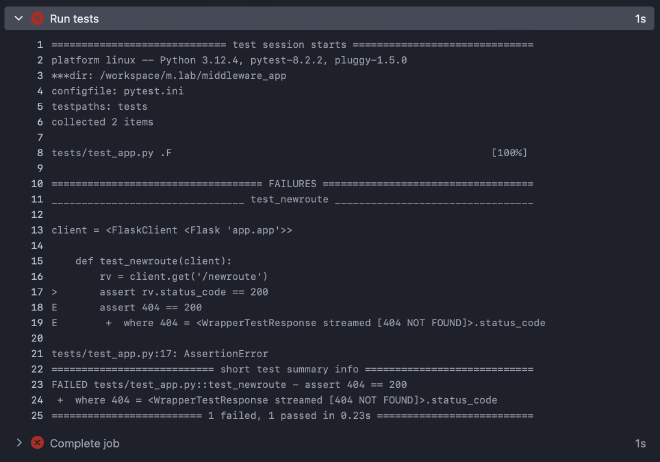
If you now look at Actions, you can see that pytest threw an error.
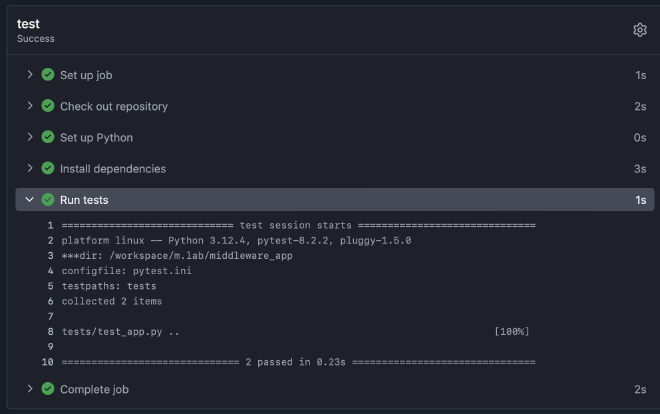
Now we add our new function to app/app.py and pytest will be happy :-)
...
@app.route("/newroute")
def newroute():
    return {"message": "foobar"}
The test system is working correctly, and the application has been tested so far. Of course, after deployment to the test system, you can add additional steps to automatically test the functions of your app to ensure all cases are working correctly.
But for now, let’s proceed to the release.
Merge development to main branch#
To merge your developments into the main branch, you can use the website.
Generate pull request#
Select the pull direction; we want to pull from development to main.

Below, you can now see what will be included in the pull request.
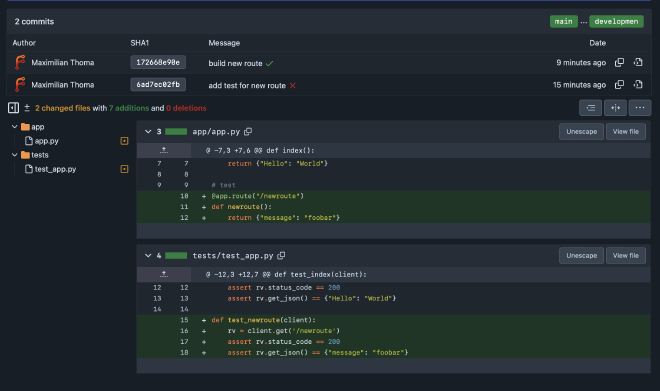
Click on New pull request, then you can add a description of your changes and click Create pull request.

Below the commits in the pull request, you can see that the CI/CD tests have already passed from the last commit, so you can directly merge your changes to the main branch. If the tests are not completed, it will not allow the merge.
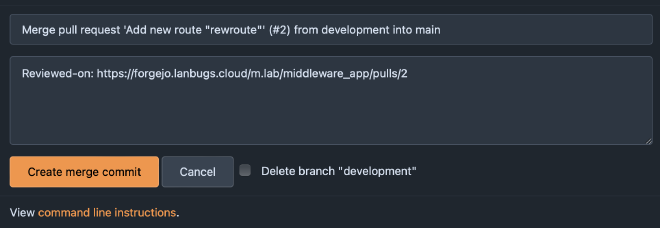
Click on Create merge commit. Now you can summarize your merge commit.
Do not tick ‘Delete branch’, because we will always use the development branch
to work on new features.
Now you will see on the commit graph the merge.

Release new version#
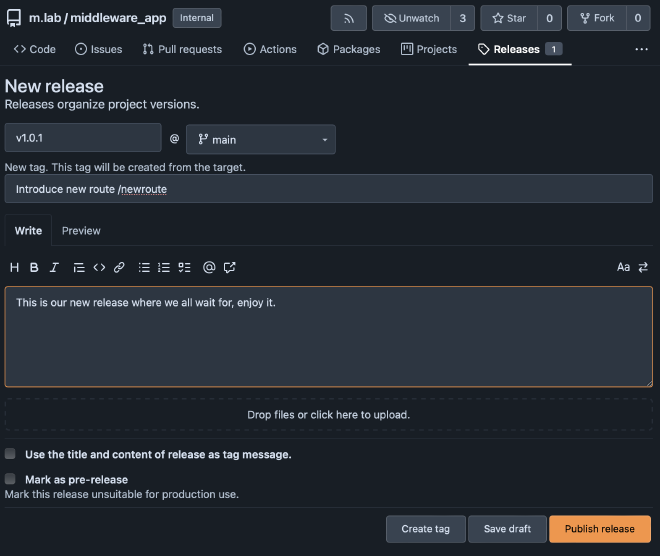
Everything is tested, and we have our change window to roll out the new release.
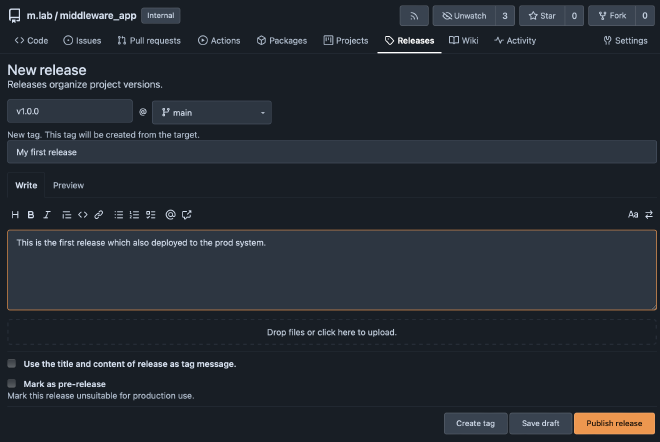
Goto Releases and click New Release.
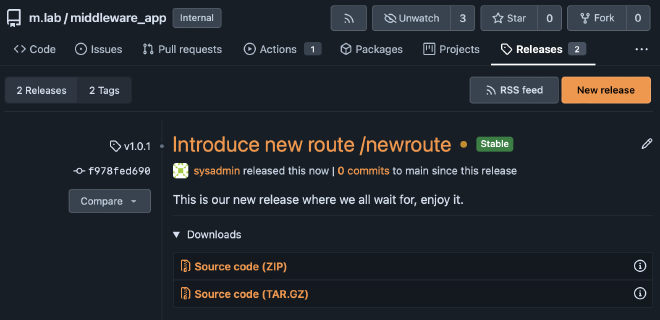
In the release list, the new one now appears. You can see the orange ball behind the title, indicating that a workflow is running, which tests, builds, and deploys the new container to production.
Tip#
You can prevent direct commits to the main branch in Forgejo.
To configure this, go to your repository’s Settings > Branches and add a new
branch protection rule.
Set only the Protected branch name pattern to main and leave all other
settings at their default values.
This will prevent direct commits to the main branch, allowing only merges.
Conclusion#
In this article, I demonstrated how to use Forgejo as a CI/CD tool for managing middleware container deployments. Forgejo, a community-driven alternative to GitLab and Bitbucket, is perfect for on-premises build pipelines.
I walked through setting up Forgejo and its runners, creating workflows for development and production branches, and deploying applications using Docker containers. This setup ensures automated testing and streamlined deployment, enhancing code quality and reducing downtime.
By following this guide, you can implement a similar CI/CD pipeline tailored to your needs, benefiting from a stable main branch and continuous integration through the development branch. Forgejo’s open governance and community-driven development ensure it will continue to meet developers’ needs worldwide.
Try Forgejo for your next project and enjoy a reliable, efficient CI/CD pipeline.
Happy automating! 😊