
If you’re tired of feeling like a circus performer juggling flaming torches when provisioning Cisco devices, it’s time to meet your new best friend: Netbox. Picture this: Netbox is like the master chef in your kitchen, whipping up perfect configurations with its secret ingredients – the config context and config template system. These magical components generate flawless configurations faster than you can say “network meltdown.”
But wait, there’s more! Netbox then hands off these configurations to a hardworking delivery guy – let’s call him Middleware Mike – who uses the Cisco PnP (Plug and Play) method to ensure your devices get the right setup every time. It’s like having a pizza delivered, but instead of extra cheese, it’s extra efficiency.
This dynamic duo makes sure your configurations are consistent and automated, drastically cutting down on those “oops” moments. Plus, it speeds up the whole deployment process so much that you’ll have time to actually enjoy your coffee break. With Netbox in your corner, network management becomes a smooth, well-oiled machine – no clown shoes required.
At a glance#
The Cisco device begins by sending a DHCP request and receiving an IP address with option 43. It then contacts Middleware using a GET /pnp/HELLO and a POST /pnp/WORK-REQUEST. Middleware checks Netbox to see if the device exists and creates it if necessary, while the Admin configures and stages the new device. If the device retries the configuration, it sends another POST /pnp/WORK-REQUEST and Middleware provides the location of the configuration. The device retrieves the configuration token, and Middleware requests the rendered configuration from Netbox, which is then sent to the device. The device subsequently sends a POST /pnp/WORK-RESPONSE to Middleware. Middleware updates Netbox, setting the device state to active, and responds with “Bye.” Finally, the Cisco device restarts, completing the process.
DHCP configuration#
There are several options to tell the device how to find the PnP server, with the most common being the use of DHCP option 43 to define the server.
Syntax option 43#
<DHCP-typecode><feature-opcode><version><debug-option>;<arglist>
| Parameter | Description |
|---|---|
| DHCP-typecode | DHCP sub-option, for PnP is 5 |
| feature-opcode | Can be Active (A) or Passive (P). A means Agent tries to reach the server, if no connection is possible the agent retries until it works. |
| version | Version of the template |
| debug-option | Turn ON or OFF debug messages of DHCP processing D is ON and N is OFF |
| ; | Delimiter to seperate params |
| arglist | List of arguments (see arglist) |
Syntax for arglist#
B<IP address type>;I<IP address/hostname>;J<Port>;K<Transport protocol>;N<XMPP User name>;O<XMPP Password>;P<XMPP server JID>;T<Trust pool CA bundle URL>;Z<NTP server IP address>”
| Letter code | Description | Mandatory? |
|---|---|---|
| B | 1 host, 2 IPv4, 3 IPv6 | Opt. Default IPv4 |
| I | hostname or ip | Mandatory |
| J | Portnumber | Optional |
| K | 4 HTTP, 5 HTTPs (other options available, see link) | Opt. Default HTTP |
| T | URL CA Bundle | Mandatory for HTTPS |
| Z | NTP server IP address. | Mandatory for HTTPS |
Segments are splitted with ;.
5A1N;B2;I10.62.4.5;J2222;K4 means IPv4, server 10.62.4.5, port 2222, proto HTTP. In this example
I only show the HTTP method, HTTPs becomes a separate article.
For additional informations see documentation of Cisco PnP or Cisco PnP XE16 book
ISC DHCPD config#
If you are using ISC DHCPD you can add a new class to your /etc/dhcp/dhcpd.conf, the vendor-class-identifier must be set
to ciscopnp. As option vendor-encapsulated-options (Option 43) is set to 5A1N;B2;I10.62.4.5;J2222;K4.
class "ciscopnp" {
  match if option vendor-class-identifier = "ciscopnp";
  option vendor-encapsulated-options "5A1N;B2;I10.62.4.5;J2222;K4";
}
Middleware#
The middleware is a Docker container that runs a Flask application. I will explain the complete setup here.
cisco_pnp_middleware
├── Dockerfile
├── app
│   ├── app.py
│   ├── helper.py
│   ├── netbox.py
│   └── templates
│       ├── bye.xml
│       └── config_upgrade.xml
├── docker-compose.yml
├── env
└── requirements.txt
Dockerfile#
The Dockerfile is the build instruction for the docker container.
FROM python:3.12
MAINTAINER Maximilian Thoma
WORKDIR /app
COPY requirements.txt requirements.txt
RUN pip install --no-cache-dir -r requirements.txt
COPY ./app .
EXPOSE 2222
CMD ["gunicorn", "--bind", "0.0.0.0:2222", "--access-logfile", "-", "--error-logfile", "-", "app:app"]
docker-compose.yaml#
The docker-compose.yaml is used by docker compose, this will start the build process of the container and run it.
---
version: '3.8'

services:
  cisco_pnp_middleware:
    image: cisco_pnp_middleware:1.1
    build:
      dockerfile: Dockerfile
    env_file:
      - ./.env
    ports:
      - '2222:2222'
.env#
The .env file contains configuration settings that will be presented in the Docker container as environment (ENV) variables.
# netbox url
APP_NETBOX_URL=http://10.62.4.5:8000

# netbox api token with R/W
APP_NETBOX_TOKEN=80cba4ba7d171b679db7c03e026196192bfa7223

# enable secure config
APP_SEC_CONFIG=true
APP_SEC_KEY=87f8s7f896f7987d89698sdd89as7fsd
APP_SEC_AGE=900

# pnp config ip and port
APP_PNP_IP=10.62.4.5
APP_PNP_PORT=2222
| Variable | Description |
|---|---|
| APP_NETBOX_URL | URL of the Netbox instance |
| APP_NETBOX_TOKEN | API token of Netbox (R/W required for template generation) |
| APP_SEC_CONFIG | Enable/Disable secure config (when enabled config is only 15 minutes (900 seconds) reachable. SEC_CONFIG means NOT encryption of traffic. |
| APP_SEC_AGE | Define the time how long config is reachable under same token |
| APP_SEC_KEY | Key for the URLSafeTimedSerializer |
| APP_PNP_IP | External IP of the PnP middleware |
| APP_PNP_PORT | External port of the PnP middleware |
requirements.txt#
The requirements.txt file contains the information about the required Python libraries.
These libraries will be automatically installed in the container during the build process.
app.py#
The application has multiple endpoints to handle various PnP requests and responses. The /pnp/HELLO endpoint responds to Cisco device HELLO requests with a 200 OK status.
from flask import Flask, request, Response, render_template
from dynaconf import FlaskDynaconf
from helper import parse_cisco_pnp, parse_pnp_xml_response
from netbox import check_device_existing, add_device, get_config, check_device_staged, set_device_status_active
from itsdangerous import URLSafeTimedSerializer

app = Flask(__name__)
FlaskDynaconf(app, envvar_prefix='APP')


@app.route("/pnp/HELLO")
def hello():
    """
    This endpoint answers to HELLO requests of Cisco devices with 200/OK
    :return:
    """
    return "", 200
The /pnp/WORK-REQUEST endpoint processes POST requests to handle work requests from Cisco devices. It parses incoming PnP data and checks if the device exists in Netbox. If the device doesn’t exist, it adds the device to Netbox. If the device is in staging mode, it generates a configuration URL with a secure token (if enabled) and responds with an XML template for configuration upgrade.
@app.route("/pnp/WORK-REQUEST", methods=["POST"])
def work_request():
    """
    Process a POST request for the "/pnp/WORK-REQUEST" route.
    """
    data = parse_cisco_pnp(request.data)

    # Check if device is present in Netbox
    if check_device_existing(data['sn']) is False:
        add_device(data['sn'], data['pid'], request.remote_addr)

    # Check if device is in mode staging in Netbox
    if check_device_staged(data['sn']):
        if app.config.SEC_CONFIG is True:
            serializer = URLSafeTimedSerializer(app.config.SEC_KEY)
            token = serializer.dumps(data['sn'])
        else:
            token = data['sn']

        location = f"http://{app.config.PNP_IP}:{app.config.PNP_PORT}/c/{token}"

        return Response(
            render_template(
                "config_upgrade.xml",
                reload_delay = 5,
                udi=data['udi'],
                correlator=data['correlator'],
                location=location
            ), mimetype='application/xml')

    return "", 200
The /pnp/WORK-RESPONSE endpoint processes work response requests, parses the PnP XML response, and sets the device status to active in Netbox if the response indicates success.
@app.route("/pnp/WORK-RESPONSE", methods=["POST"])
def work_response():
    """
    Process WORK-RESPONSE requests.
    """
    data = parse_pnp_xml_response(request.data)

    if data['success'] == '1':
        set_device_status_active(data['sn'])

    return Response(
        render_template(
            "bye.xml",
            udi=data['udi'],
            correlator=data['correlator']
        ), mimetype='application/xml')
The /c/
@app.route("/c/<token>")
def return_config(token: str):
    """
    Method to return configuration based on provided token.

    :param token: A string representing the token for retrieving the configuration.
    :return: A Response object containing the configuration in plain text format.
    """
    if app.config.SEC_CONFIG is True:
        try:
            serializer = URLSafeTimedSerializer(app.config.SEC_KEY)
            token = serializer.loads(token, max_age=app.config.SEC_AGE)
        except:
            return Response(status=404)

    return Response(get_config(token), mimetype="text/plain")


if __name__ == "__main__":
    app.run(host='0.0.0.0', port=2222, debug=True)
helper.py#
The helpers are used to parse XML responses from the devices.
import xml.etree.ElementTree as ET
from xml.dom import minidom


def parse_cisco_pnp(xml_string):
    # Parse the XML string
    root = ET.fromstring(xml_string)

    # Define namespaces
    namespaces = {
        'pnp': 'urn:cisco:pnp',
        'info': 'urn:cisco:pnp:work-info'
    }

    # Extract the root element attributes
    pnp_version = root.attrib.get('version')
    udi = root.attrib.get('udi')

    # Extract PID, VID, and SN from the udi
    pid, vid, sn = None, None, None
    if udi:
        parts = udi.split(',')
        for part in parts:
            if part.startswith('PID:'):
                pid = part.split(':')[1]
            elif part.startswith('VID:'):
                vid = part.split(':')[1]
            elif part.startswith('SN:'):
                sn = part.split(':')[1]

    # Find the info element
    info_elem = root.find('info:info', namespaces)
    correlator = info_elem.attrib.get('correlator')

    # Find the deviceId element
    device_id_elem = info_elem.find('info:deviceId', namespaces)
    device_udi = device_id_elem.find('info:udi', namespaces).text
    hostname = device_id_elem.find('info:hostname', namespaces).text
    auth_required = device_id_elem.find('info:authRequired', namespaces).text
    via_proxy = device_id_elem.find('info:viaProxy', namespaces).text
    security_advise = device_id_elem.find('info:securityAdvise', namespaces).text

    # Create a dictionary to hold the extracted data
    parsed_data = {
        'pnp_version': pnp_version,
        'udi': udi,
        'pid': pid,
        'vid': vid,
        'sn': sn,
        'correlator': correlator,
        'device_udi': device_udi,
        'hostname': hostname,
        'auth_required': auth_required,
        'via_proxy': via_proxy,
        'security_advise': security_advise
    }

    return parsed_data


def parse_pnp_xml_response(xml_data):
    # Define namespace
    namespaces = {
        'pnp': 'urn:cisco:pnp',
        'config-upgrade': 'urn:cisco:pnp:config-upgrade'
    }

    root = ET.fromstring(xml_data)

    udi = root.attrib.get('udi')

    # Extract PID, VID, and SN from the udi
    pid, vid, sn = None, None, None
    if udi:
        parts = udi.split(',')
        for part in parts:
            if part.startswith('PID:'):
                pid = part.split(':')[1]
            elif part.startswith('VID:'):
                vid = part.split(':')[1]
            elif part.startswith('SN:'):
                sn = part.split(':')[1]

    parsed_data = {
        'pid': pid,
        'vid': vid,
        'sn': sn,
        'udi': udi
    }

    response = root.find('config-upgrade:response', namespaces)
    if response is not None:
        parsed_data['success'] = response.attrib.get('success', None)
        parsed_data['correlator'] = response.attrib.get('correlator', None)
    else:
        parsed_data['success'] = None
        parsed_data['correlator'] = None

    return parsed_data
netbox.py#
The program includes functions to check if an IP address belongs to a given subnet,
verify if a device exists in Netbox, and ensure the existence of an Undefined
site and device role. It also determines the appropriate site for a device based
on its IP address and adds new devices to Netbox with a planned status.
Additionally, the program checks if a device is in the staged status,
retrieves device configurations, and sets device statuses to active.
import pynetbox
import requests
from dynaconf import Dynaconf
import ipaddress

# Config
config = Dynaconf(envvar_prefix='APP')

# Init Netbox
session = requests.Session()
session.verify = False
nb = pynetbox.api(config.NETBOX_URL, token=config.NETBOX_TOKEN)
nb.http_session = session


def ip_in_subnet(ip, subnet):
    ip_addr = ipaddress.ip_address(ip)
    subnet_net = ipaddress.ip_network(subnet, strict=False)
    return ip_addr in subnet_net


def check_device_existing(sn):
    if nb.dcim.devices.count(serial=sn) == 0:
        return False
    return True


def undefined_site():
    if nb.dcim.sites.count(name='Undefined') == 0:
        site = nb.dcim.sites.create(
            name='Undefined',
            slug='undefined'
        )
        return site.id
    else:
        return nb.dcim.sites.get(name='Undefined').id


def undefined_device_role():
    if nb.dcim.device_roles.count(name='Undefined') == 0:
        return nb.dcim.device_roles.create(
            name='Undefined',
            slug='undefined'
        ).id
    else:
        return nb.dcim.device_roles.get(name='Undefined').id


def determine_site(ip):
    subnets = nb.ipam.prefixes.filter(tag="pnp_network")

    for subnet in subnets:
        if ip_in_subnet(ip, subnet.prefix):
            return subnet.site.id

    return undefined_site()


def add_device(sn, pid, ip):
    device = nb.dcim.devices.create(
        name=sn,
        serial=sn,
        status='planned',
        site=determine_site(ip),
        device_type=nb.dcim.device_types.get(part_number=pid).id,
        role=undefined_device_role(),
    )
    return device


def check_device_staged(sn):
    device = nb.dcim.devices.get(serial=sn)
    if device.status.value == 'staged':
        return True
    return False


def get_config(serial):
    device = nb.dcim.devices.get(serial=serial)

    headers = {
        "Authorization": f"Token {config.NETBOX_TOKEN}",
        "Content-Type": "application/json"
    }

    response = requests.post(f"{config.NETBOX_URL}/api/dcim/devices/{device.id}/render-config/", headers=headers, verify=False)

    if response.status_code == 200:
        return response.json()['content']
    else:
        return ""


def set_device_status_active(sn):
    device = nb.dcim.devices.get(serial=sn)
    device.status = 'active'
    device.save()
    return device
templates/config_upgrade.xml#
This template is used as answer to /pnp/WORK-REQUEST POST request.
<?xml version="1.0" encoding="UTF-8"?>
<pnp xmlns="urn:cisco:pnp" version="1.0" udi="{{ udi }}">
    <request correlator="{{ correlator }}" xmlns="urn:cisco:pnp:config-upgrade">
        <config details="all">
            <copy>
                <source>
                    <location>{{ location }}</location>
                </source>
            </copy>
        </config>
        {% if reload_delay is defined %}
        <reload>
            <reason>pnp device config</reason>
            <delayIn>{{ reload_delay }}</delayIn>
            <user>pnp-device-config</user>
            <saveConfig>true</saveConfig>
        </reload>
        {% else %}
            <noReload/>
        {% endif %}
    </request>
</pnp>
templates/bye.xml#
This template is used as answer to /pnp/WORK-RESPONSE POST request.
<?xml version="1.0" encoding="UTF-8"?>
<pnp xmlns="urn:cisco:pnp" version="1.0" udi="{{ udi }}">
  <info xmlns="urn:cisco:pnp:work-info" correlator="{{ correlator }}">
    <workInfo>
      <bye/>
    </workInfo>
  </info>
</pnp>
Netbox#
Add tag & prefix#
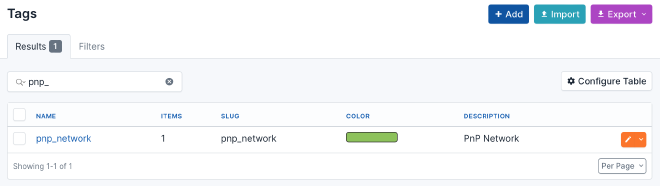
To ensure that your new devices are assigned directly to the correct site,
you must add the prefix of your PnP network to IPAM > Prefixes,
tag it with pnp_network, and set the correct site. The middleware will
search for prefixes flagged with pnp_network to identify the site. If no
site matches or no pnp_network tag is set, the middleware will search for a
site named Undefined, if this site does not exist, the middleware will create it.
To create a new tag goto Customization > Tags.
Import device models#
Before you start, make sure you have imported the device models if you haven’t already. There’s a great project that assists in importing various device models, including all Cisco devices.
git clone https://github.com/netbox-community/Device-Type-Library-Import
cd Device-Type-Library-Import
python3 -m venv venv
source venv/bin/activate
pip install -r requirements.txt
Modify the settings
cp .env.example .env
vim .env
Now you can import device models
./nb-dt-import.py --vendors cisco
Playtime :-)#
0. Configure & Fireup docker container#
- Generate token on Netbox
- Setup .env file to correct settings
- Use
docker-compose upto start the middleware in project root folder
1. Boot switch#
When you boot a plain switch, it will automatically attempt to initiate PnP. You can see this in the CLI logs.
*Jun 20 20:42:13.782: %SYS-6-BOOTTIME: Time taken to reboot after reload =  326 seconds
*Jun 20 20:42:19.287: %PNP-6-HTTP_CONNECTING: PnP Discovery trying to connect to PnP server http://10.62.4.5:2222/pnp/HELLO
*Jun 20 20:42:20.313: %SYS-5-CONFIG_P: Configured programmatically by process EPM CREATE DEFAULT CWA URL ACL from console as console
*Jun 20 20:42:20.373: %PNP-6-HTTP_CONNECTED: PnP Discovery connected to PnP server http://10.62.4.5:2222/pnp/HELLO
At the same time, you can see the /pnp/HELLO requests in the Docker logs, followed shortly by /pnp/WORK-REQUEST.
cisco_pnp_middleware-1  | 192.168.65.1 - - [20/Jun/2024:20:43:03 +0000] "GET /pnp/HELLO HTTP/1.1" 200 0 "-" "cisco-IOS"
cisco_pnp_middleware-1  | 192.168.65.1 - - [20/Jun/2024:20:43:10 +0000] "POST /pnp/WORK-REQUEST HTTP/1.1" 200 0 "-" "cisco-IOS"
cisco_pnp_middleware-1  | 192.168.65.1 - - [20/Jun/2024:20:44:09 +0000] "POST /pnp/WORK-REQUEST HTTP/1.1" 200 0 "-" "cisco-IOS"
Because there is no device in the staged state, the device receives empty 200 OK responses.
Now you can see in Netbox that the middleware has created the new device.
2. Configure your new device#
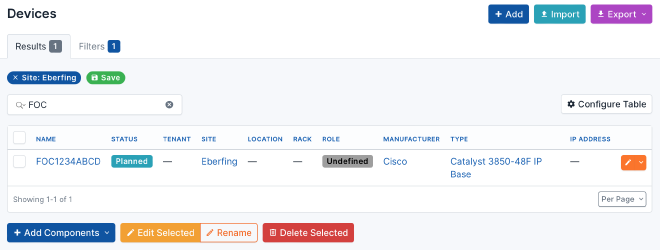
You can start configuring the new device by setting a suitable hostname,
the device role to Access Switch, and applying the config template.

Next, navigate to the interfaces and assign the future management IP address
to the out-of-band interface, mark the IP as Make this the primary IP for the device/VM.
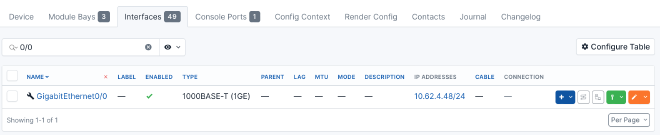
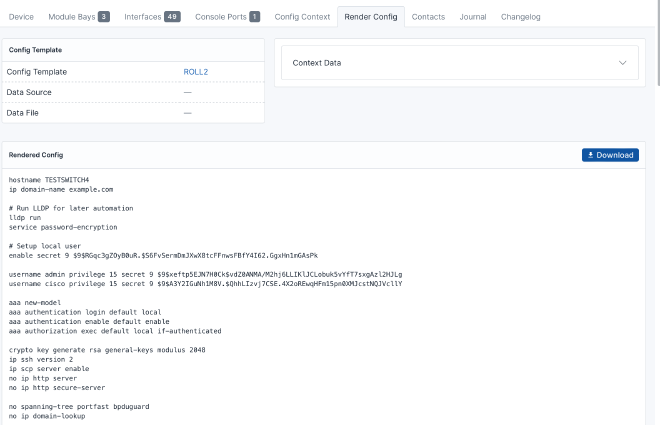
Now you can precheck if the config rendering is working fine.
Finally, set the state to staged. On the next attempt by the device
to perform /pnp/WORK-REQUEST, the middleware responds with the location of the config.
The device then pulls the configuration and begins applying it.
3. PnP configures the device#
cisco_pnp_middleware-1  | 192.168.65.1 - - [20/Jun/2024:20:45:09 +0000] "POST /pnp/WORK-REQUEST HTTP/1.1" 200 907 "-" "cisco-IOS"
cisco_pnp_middleware-1  | 192.168.65.1 - - [20/Jun/2024:20:45:09 +0000] "GET /c/IkZPQzIwMzdYMFcwIg.ZnSU1Q.H_NiZnV_xsF0kZkXBFpNC3fSBic HTTP/1.1" 200 3389 "-" "cisco-IOS"
cisco_pnp_middleware-1  | 192.168.65.1 - - [20/Jun/2024:20:45:10 +0000] "GET /c/IkZPQzIwMzdYMFcwIg.ZnSU1Q.H_NiZnV_xsF0kZkXBFpNC3fSBic HTTP/1.1" 200 3389 "-" "cisco-IOS"
On the device, you can now see that it is working on the file, and at the end, it will reboot.
...
*Jun 20 20:44:45.377: %SYS-5-CONFIG_P: Configured programmatically by process XEP_pnp-zero-touch from console as vty0
*Jun 20 20:44:51.574: %SYS-5-CONFIG_P: Configured programmatically by process XEP_pnp-zero-touch from console as vty0
*Jun 20 20:44:52.575: %PNP-6-PNP_TECH_SUMMARY_SAVED_OK: PnP tech summary (pnp-tech-reload-summary) saved successfully.


***
*** --- SHUTDOWN NOW ---
***
The last request from the device before it reboots is the /pnp/WORK-RESPONSE. In this step, the middleware sets the device state to active.
cisco_pnp_middleware-1 | 192.168.65.1 - - [20/Jun/2024:20:45:36 +0000] "POST /pnp/WORK-RESPONSE HTTP/1.1" 200 284 "-" "cisco-IOS"
4. Ready#
The device is now ready enjoy it :-)
Sources#
GitHub - lanbugs/livelab_cisco_pnp_provisioning_with_netbox
Conclusion#
In conclusion, using Netbox for Cisco PnP provisioning is like having a personal assistant for your network. It automatically handles configurations, reducing errors and speeding up deployments. The process is simple: the Cisco device sends a hello, the middleware checks with Netbox, and boom—your device is configured and ready to roll. Follow the steps to set up DHCP, Docker and Netbox, and watch as your devices practically configure themselves. It’s efficient, reliable, and a real time-saver. So, kick back, relax, and let the robots handle the tedious stuff!
Happy automating! 😊