
So, you’re diving into the world of middleware containers, huh? Well, buckle up because storing your API credentials directly in the container is a no-go. Instead, let’s add some magic by using environment variables (ENV variables) to inject those precious credentials into your container. But wait, there’s more!
Imagine juggling the same credentials across multiple containers. Storing them in each one is like hiding Easter eggs you’ll never find. Plus, wouldn’t it be nice to know who’s using them? The answer to all your problems: a central storage spot for your credentials. It’s like having a magical treasure chest that’s easy to update when you need to swap out the keys.
I’ll show you how to set up HashiCorp Vault to stash your credentials and access them using Python hvac, native methods, bash, and Ansible.
Let’s get started on this adventure!
Setup your Hashicorp Vault#
Docker or native?#
You have the option to run Vault either in a Docker container or directly on a native machine. Running Vault in Docker allows for easy deployment and isolation of the application, making it ideal for testing and development environments. Alternatively, running Vault natively on a machine can provide performance benefits and direct access to system resources, which may be more suitable for production environments. Each method has its own advantages depending on your specific use case and requirements.
Native installation#
If you are using Debian / Ubuntu:
wget -O- https://apt.releases.hashicorp.com/gpg | sudo gpg --dearmor -o /usr/share/keyrings/hashicorp-archive-keyring.gpg
echo "deb [signed-by=/usr/share/keyrings/hashicorp-archive-keyring.gpg] https://apt.releases.hashicorp.com $(lsb_release -cs) main" | sudo tee /etc/apt/sources.list.d/hashicorp.list
sudo apt update && sudo apt install vault
Centos / RHEL:
sudo yum install -y yum-utils
sudo yum-config-manager --add-repo https://rpm.releases.hashicorp.com/RHEL/hashicorp.repo
sudo yum -y install vault
Other OS:
To autostart vault you can create systemd start file.
/etc/systemd/system/vault.service
[Unit]
Description="HashiCorp Vault - A tool for managing secrets" Documentation=https://www.vaultproject.io/docs/
Requires=network-online.target
After=network-online.target ConditionFileNotEmpty=/etc/vault.d/vault.hcl StartLimitIntervalSec=60
StartLimitBurst=3

[Service]
User=vault
Group=vault
ProtectSystem=full
ProtectHome=read-only
PrivateTmp=yes
PrivateDevices=yes
SecureBits=keep-caps
AmbientCapabilities=CAP_IPC_LOCK
Capabilities=CAP_IPC_LOCK+ep
CapabilityBoundingSet=CAP_SYSLOG CAP_IPC_LOCK
NoNewPrivileges=yes
EnvironmentFile=/etc/vault.d/vault.env
ExecStart=/usr/bin/vault server -config=/etc/vault.d/vault.hcl ExecReload=/bin/kill --signal HUP $MAINPID
KillMode=process
KillSignal=SIGINT
Restart=on-failure
RestartSec=5
TimeoutStopSec=30
StartLimitInterval=60
StartLimitIntervalSec=60
StartLimitBurst=3
LimitNOFILE=65536
LimitMEMLOCK=infinity

[Install]
WantedBy=multi-user.target
To enable reload systemd and enable the service.
systemctl daemon-reload
systemctl enable --now vault.service
Docker#
Create in folder docker-compose.yaml and the folders file and config.
docker-compose.yaml
services:
    myvault:
        image: hashicorp/vault:latest
        container_name: myvault
        ports:
          - "8200:8200"
        volumes:
          - ./file:/vault/file:rw
          - ./config:/vault/config:rw
        cap_add:
          - IPC_LOCK
        entrypoint: vault server -config=/vault/config/vault.json
config/vault.json
{
   "backend":{
      "file":{
         "path":"/vault/file"
      }
   },
   "listener":{
      "tcp":{
         "address":"0.0.0.0:8200",
         "tls_disable":1
      }
   },
   "default_lease_ttl":"168h",
   "max_lease_ttl":"0h",
   "ui":true,
   "log_level":"Debug"
}
You can start the docker environment with:
docker-compose up -d
Basic setup#
Once you have started your Vault instance, it can be accessed through http://localhost:8200 or http://your-ip:8200.
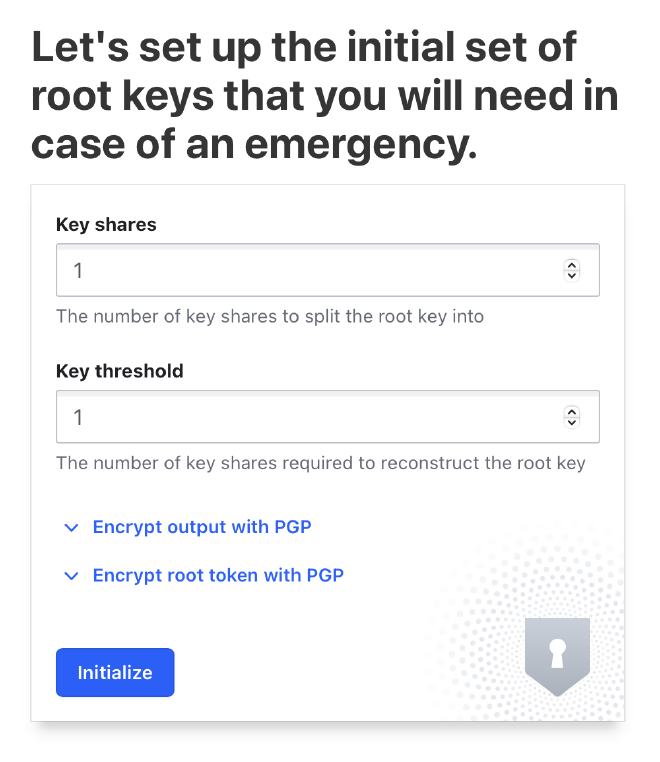
The next step is to define the number of shares and the threshold number of shares required to unlock the Vault. For example, you can create 5 shares and set the requirement that any 2 of these 5 shares are needed to unlock the Vault. This means that any combination of 2 out of the 5 shares will be sufficient to gain access.
The shared encryption process is handled using the Shamir secret sharing algorithm. This algorithm divides the secret into multiple parts (shares), ensuring that only a specified minimum number of shares (threshold) can be used together to reconstruct the original secret. For more information on how Shamir’s secret sharing algorithm works, you can refer to the Wikipedia article on Shamir’s secret sharing.
In this demo, I have set the number of shares to 1 and the threshold to 1. This configuration means that only one key exists, and only that single key is needed to unlock the Vault.
Once you click Initialize, the Vault will be created.
Be sure to store the keys securely, as you will need them to log in as
the root user and unlock the Vault.
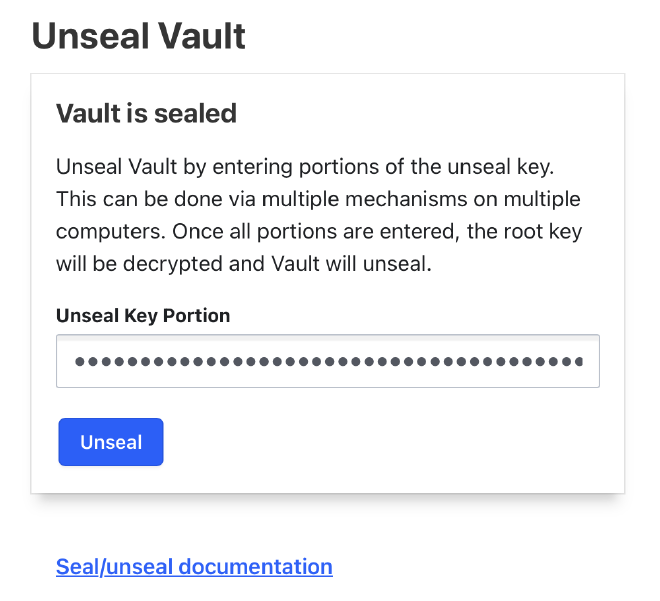
Goto Continue to Unseal
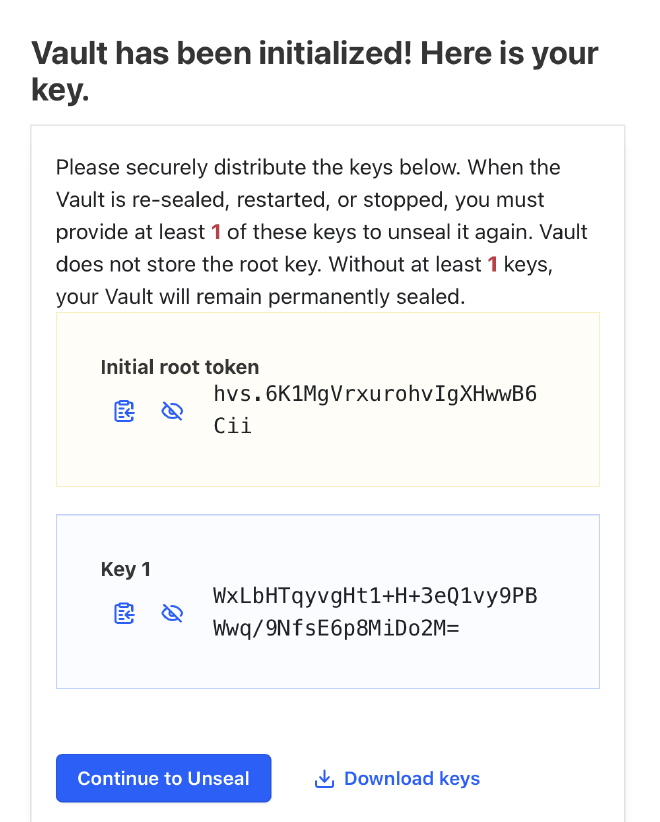
Enter your unseal key eg. WxLbHTqyvgHt1+H+3eQ1vy9PBWwq/9NfsE6p8MiDo2M= and click Unseal.
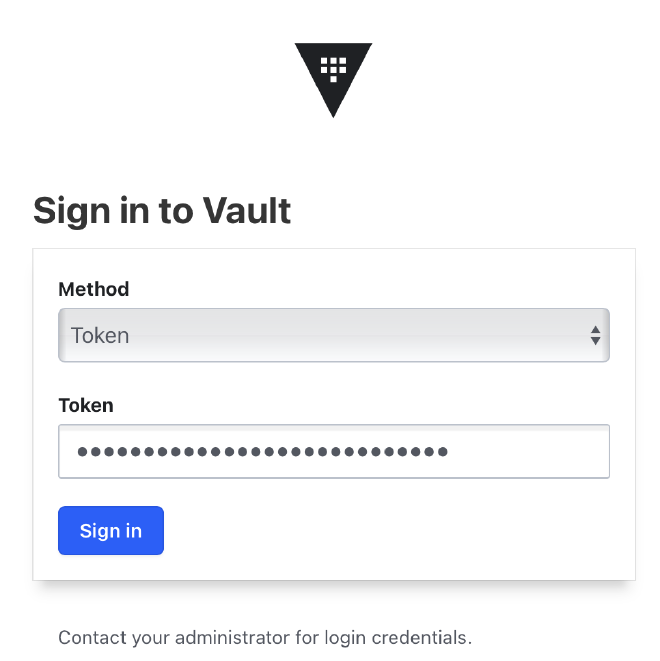
Use your root token eg. hvs.6K1MgVrxurohvIgXHwwB6Cii to login.
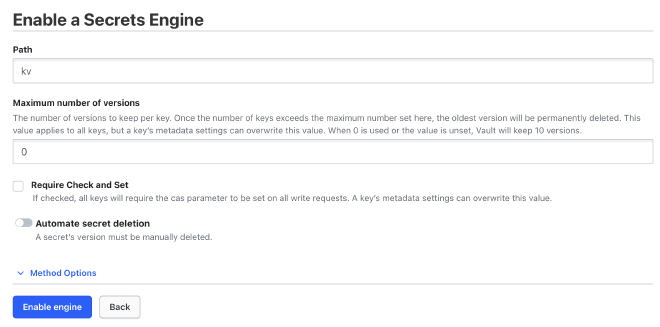
First, we need to activate a secrets engine where we can store key-value pairs.
This is essential for managing the secrets that the Vault will protect.
Just let all settings on the default values and click Enable engine.
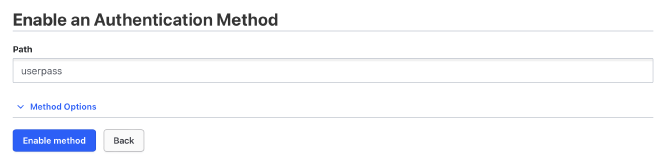
Next, I enabled the Username & Password engine under Access > Authentication Methods to
allow login with a username and password to access the stored credentials.
This enables secure access control to the Vault using familiar authentication
methods. Just let all settings also on default and click Enable method.
Access to the key-value store is regulated by policies.
A policy defines what actions a user can perform, such as viewing,
editing, creating, or reading from the store.
By configuring these policies, you can precisely control the permissions
for each user or group, ensuring secure and appropriate
access to the stored secrets.
You can create a policy under Policies > ACL Policies.
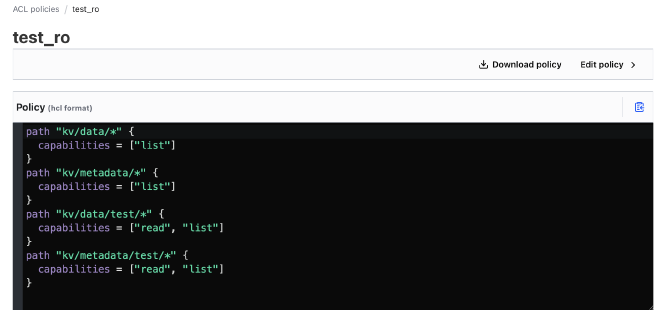
This policy allows listing all data and metadata under the kv path
and provides read and list capabilities specifically for the test path under kv.
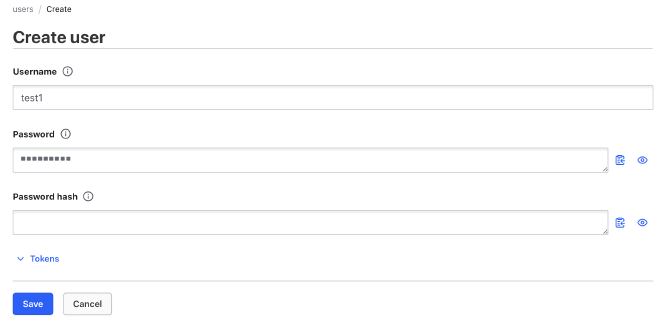
Next, I created a test user with a username and password. This was done by navigating to Access > Authentication Methods > userpass > Create user +.
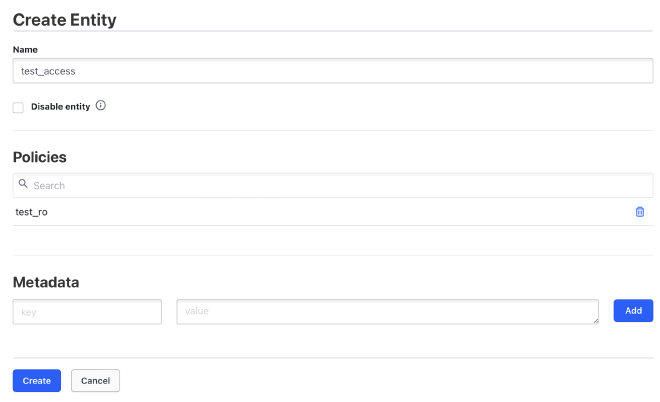
The final step is to create an entity under Access > Entities, which assigns a role to a user.
To do this, navigate to Access > Entities and create a new entity.
Select the new test_ro role under policies, give the entity a name, and save it.
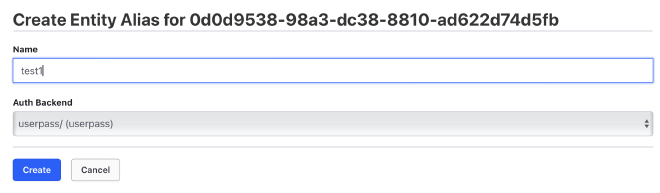
Then, you can assign an alias by selecting the userpass authentication backend and entering the new username. Finally, save the changes.
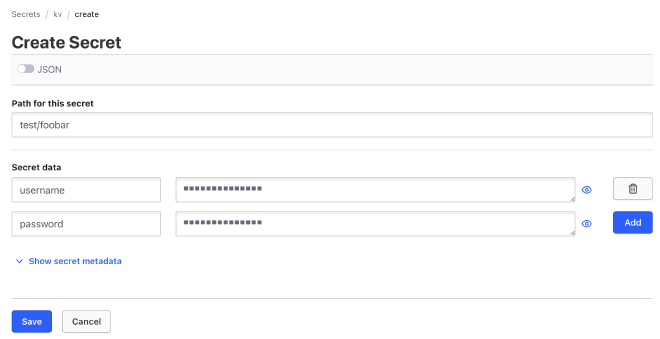
The last step is to create a credential key-value set in the new kv store.
Go to Secret engines > kv and click Create secret.
Enter test/foobar in the path field; in this case,
test is a folder where we have given permission by the policy.
Add key-value pairs to the secret store and click Save.
Now everything is prepared to show different ways to consume credentials from the store.
Use HVAC libraries#
HashiCorp provides a client library that you can use to access your stored credentials. Here is an example using Python:
import hvac

# connect to vault
client = hvac.Client(url="http://localhost:8200")

# login
client.auth.userpass.login(
    username="test_ro",
    password="testpass",
)

# consume credentials
read_response = client.secrets.kv.read_secret_version(mount_point='kv', raise_on_deleted_version=False, path="test/foobar")

print(read_response['data']['data'])
This script demonstrates how to connect to Vault,
authenticate using the userpass method, and read a secret from the `kv store.
Use requests#
You can also use the requests library to access Vault
if you prefer not to use the additional hvac library.
import requests
import json

# Define Vault address
vault_url = "http://localhost:8200"

# Login to Vault
login_url = f"{vault_url}/v1/auth/userpass/login/test_ro"
login_payload = {
    "password": "testpass"
}
login_response = requests.post(login_url, json=login_payload)
login_response.raise_for_status()

# Extract the client token
client_token = login_response.json()['auth']['client_token']

# Read secret from the kv store
secret_url = f"{vault_url}/v1/kv/data/test/foobar"
headers = {
    "X-Vault-Token": client_token
}
secret_response = requests.get(secret_url, headers=headers)
secret_response.raise_for_status()

# Print the secret data
print(secret_response.json()['data']['data'])
Use ansible hashicorp module#
In the tasks section, the first task retrieves secrets from Vault using the
community.hashi_vault.vault_kv2_get module. It accesses the secrets stored
at test/foobar within the kv engine, authenticating with the userpass method.
The retrieved secrets are stored in the response` variable.
---
- name: Retrieve secrets from HashiCorp Vault
  hosts: localhost

  vars:
    vault_url: "http://127.0.0.1:8200"
    vault_username: "test_ro"
    vault_password: "testpass"

  tasks:
    - name: Retrieve username and password from Vault
      community.hashi_vault.vault_kv2_get:
        url: "{{ vault_url }}"
        engine_mount_point: kv
        path: test/foobar
        auth_method: userpass
        username: "{{ vault_username }}"
        password: "{{ vault_password }}"
      register: response

    - name: Print the retrieved credentials
      debug:
        msg: "Username: {{ response.secret.username }}, Password: {{ response.secret.password }}"
Use ansible uri module#
If you prefer not to rely on any external Ansible modules, the built-in uri module offers a versatile and straightforward way to interact with HashiCorp Vault. This method is particularly useful for those who want to keep their Ansible playbooks lightweight and free from external dependencies.
---
- name: Retrieve secrets from HashiCorp Vault using the uri module
  hosts: localhost

  vars:
    vault_url: "http://127.0.0.1:8200"
    vault_username: "test_ro"
    vault_password: "testpass"

  tasks:
    - name: Authenticate with Vault using userpass
      uri:
        url: "{{ vault_url }}/v1/auth/userpass/login/{{ vault_username }}"
        method: POST
        body_format: json
        body:
          password: "{{ vault_password }}"
        status_code: 200
        return_content: yes
      register: auth_response

    - name: Set Vault token
      set_fact:
        vault_token: "{{ auth_response.json.auth.client_token }}"

    - name: Retrieve secret from Vault
      uri:
        url: "{{ vault_url }}/v1/kv/data/test/foobar"
        method: GET
        headers:
          "X-Vault-Token": "{{ vault_token }}"
        status_code: 200
        return_content: yes
      register: secret_response

    - name: Print the retrieved credentials
      debug:
        msg: "Username: {{ secret_response.json.data.data.username }}, Password: {{ secret_response.json.data.data.password }}"
Bash script with curl and jq#
If you need to access the vault from the shell, you can use curl and jq to fetch the credentials.
#!/bin/bash

# Vault URL and credentials
VAULT_URL="http://127.0.0.1:8200"
VAULT_USERNAME="test_ro"
VAULT_PASSWORD="testpass"
VAULT_PATH="test/foobar"

# Authenticate with Vault using userpass
AUTH_RESPONSE=$(curl -s --request POST \
  --data '{"password": "'"$VAULT_PASSWORD"'"}' \
  "$VAULT_URL/v1/auth/userpass/login/$VAULT_USERNAME")

# Check if authentication was successful
if [ $? -ne 0 ]; then
  echo "Error during authentication."
  exit 1
fi

# Extract Vault token from the response
VAULT_TOKEN=$(echo $AUTH_RESPONSE | jq -r '.auth.client_token')

# Check if token extraction was successful
if [ -z "$VAULT_TOKEN" ]; then
  echo "Error extracting Vault token."
  exit 1
fi

# Retrieve secret from Vault
SECRET_RESPONSE=$(curl -s --request GET \
  --header "X-Vault-Token: $VAULT_TOKEN" \
  "$VAULT_URL/v1/kv/data/$VAULT_PATH")

# Check if retrieving the secret was successful
if [ $? -ne 0 ]; then
  echo "Error retrieving the secret."
  exit 1
fi

# Extract the user data from the response
USERNAME=$(echo $SECRET_RESPONSE | jq -r '.data.data.username')
PASSWORD=$(echo $SECRET_RESPONSE | jq -r '.data.data.password')

# Check if extracting the user data was successful
if [ -z "$USERNAME" ] || [ -z "$PASSWORD" ]; then
  echo "Error extracting user data."
  exit 1
fi

# Print the user data
echo "Username: $USERNAME, Password: $PASSWORD"
Conclusion#
Managing API credentials directly within middleware containers poses significant security risks, including exposure and difficulty in management. Instead, utilizing environment variables for credential injection is a more secure and manageable approach. However, for a more robust solution, centralizing credential storage using HashiCorp Vault provides an efficient and secure method.
HashiCorp Vault allows for secure storage, easy updates, and precise access control, ensuring that only authorized entities can access sensitive credentials. This setup involves creating and configuring Vault, enabling authentication methods, and establishing policies to regulate access.
Various methods, such as Python HVAC libraries, the requests library, Ansible modules, and shell scripts, can be employed to interact with Vault, demonstrating the flexibility and accessibility of this solution. Whether you choose to run Vault in a Docker container or natively on a machine, the benefits of centralized secret management greatly enhance the security and efficiency of your infrastructure.
By adopting HashiCorp Vault, you not only secure your credentials but also streamline the process of managing and accessing them across different containers and environments. This approach ensures that your credentials are protected, easily manageable, and accessible only by those who need them, reducing the risk of unauthorized access and potential breaches.